A hot surface that reaches above 106 degrees (C) (you will need high temperature paints)
Disclaimer
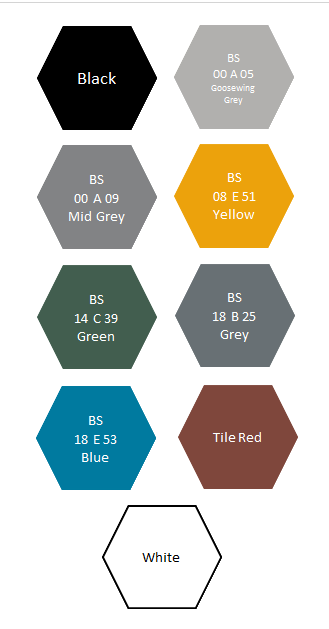
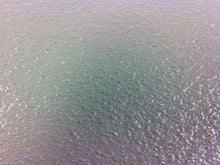
The colours shown on the images are for guidance only. The displayed colour will depend on your monitor and browsers. The finished colour therefore may not be as shown here.
All pictures are for illustration purpose only - 1 & 2.5 Litre cans are not screen-printed cans.
Description
Description
Marine non slip deck paint product name Universal PU Enamel is a single-pack polyurethane(PU) paint combined with an aggregate to make a rough, textured finish for extra grip to reduce the risk of slips. It's resistant to chemicals and regular washing with water, giving you a long-lasting finish.
Where can I use Marine Non Slip Deck Paint?
You can use non slip marine deck paint both internally and externally on the following surfaces:
Metal
Wood/timber/marine ply
Concrete
Primed fibreglass/GRP decks
This makes it the ideal marine paint for yachts, narrowboats and motorboats. It's best suited to areas of light foot traffic rather than heavy-duty commercial use.
For the most cost-effective and easy application, start by applying a standard smooth paint as the first coat. After allowing it to dry for 12–24 hours, apply the second coat using the non-slip paint.
The built-in non-slip aggregate significantly reduces the risk of accidents by improving traction. However, it’s important to note that, like any painted surface, it may still become slippery when wet.
About This Item
About This Item
NEW 3-IN-1 TECHNOLOGY: When painting wood it primes, seals and protects with just two coats. For bare concrete we recommend thinning the first coat by 20% with T0001 thinners, which acts as the primer/sealer.
NON SLIP: This Deck Paint includes an aggregate mixed in, providing a rough textured finish that reduces the risk of slips.
SUITABLE SUBSTRATES: Wood, Primed Metal and Primed Fibreglass/GRP.
DRYING TIME: Touch dry in 2-4 hours, overcoat in 12-24 hours, full protection properties after 7 days, but the area can be walked on after 4 days.
COVERAGE: Approximately 8 square metres per litre. This does not account for the method of application, absorption of substrate or wastage.
APPLICATION:Apply by brush or solvent-resistant medium pile rollers.
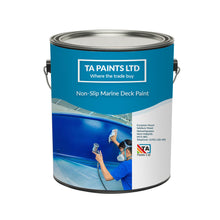
Proudly manufactured in England by B.C. Paints Ltd. Please note that images and product titles are for advertising purposes only; tins are supplied in BC Paints logo cans or plain white cans for 0.5, 1, 2.5 and occasionally 5 litre sizes.
Application
Application
Before starting, have your PPE ready, as our paint is oil-based and will not wash off easily with soap and water.
Ensure you have good ventilation to allow vapour to escape; ventilation is also necessary to maintain drying times. Without air movement, the coating won’t dry properly.
Full curing takes 7 days, so the substrate should not be submerged in water until this period has elapsed.
Be sure to stir the paint well before use.
Painting Over Existing Paint:
Step 1 - Preparation: Check the suitability of the product for the existing paint. We recommend trying a sample area first.
Step 2 - Clean and Abrade:
Ensure the existing paint is in good condition prior to painting, then lightly abrade to provide a key for good intercoat adhesion.
If there is flaking paint, it must be removed before painting.
Ensure the substrate is dry and clean of any dirt, oil or grease.
Step 3 - Prime: This step is down to personal preference. Depending on the condition of the existing paint or if you are changing a dark colour to a light one, you may want to add one coat of primer.
If the material you are painting is fibreglass or metal and is showing you will need to spot prime with the appropriate primer. If there is rust this will need removing and spot priming.
Step 4 - Topcoat: Once you have completed the previous steps, 12-24 hours after applying the primer, you can add your first coat of topcoat. Wait another 12-24 hours before applying the second coat.
Painting bare Wood:
Step 1 - Clean and Prep: Ensure the substrate is dry and clean of any dirt, oil or grease. If there is any moisture in the substrate, it can cause delamination and lead to a loss of adhesion.
Step 2 -First Coat: For the first coat, we recommend using the standard smooth Deck Paint, as it’s easier to apply than the non-slip version. Thin the first coat by 20% withT0001 White Spirit to ensure the paint impregnates the Wood, this will act as the primer/sealer.
If you prefer to use the Non-Slip Paint for the first coat, the same 20% thinning applies.
Step 3 - Top coat: 12-24 hours after applying the first coat, you can apply the second coat of topcoat. Be sure to stir the paint well before use.
Painting bare Metal or Fibreglass.
Step 1 - Clean and Prep: Ensure the substrate is dry and clean of any dirt, oil or grease. If there is any moisture on the substrate, it can cause delamination and lead to a loss of adhesion.
Step 2 - Prime:
Metal - If there is rust this will need removing and then priming with our High Build Zinc Phosphate Metal primer. If the substrate is exposed to harsh environmental factors, you can prime it with either Zinc Rich or our two-pack epoxy primer systems for optimal protection
Fibreglass/GRP/Gel Coat - Apply one coat of our Single Pack Fibreglass primer, as the topcoat will not adhere directly.
Step 3 - Top coat: Wait 12-24 hours after applying the primer before applying the first coat of topcoat. Then, after another 12-24 hours, apply the second coat. Two coats of topcoat are recommended for optimal coverage.
Primers
Primers
Mild Steel: If you are painting mild steel, you will need our metal primer.
Wood, Concrete, Stone or Brick: No primer is required;These types of substrates are often porous, so we recommend thinning the first coat by 20% to ensure it impregnates the substrate, this will act as the primer/sealer.
Mixing
Mixing
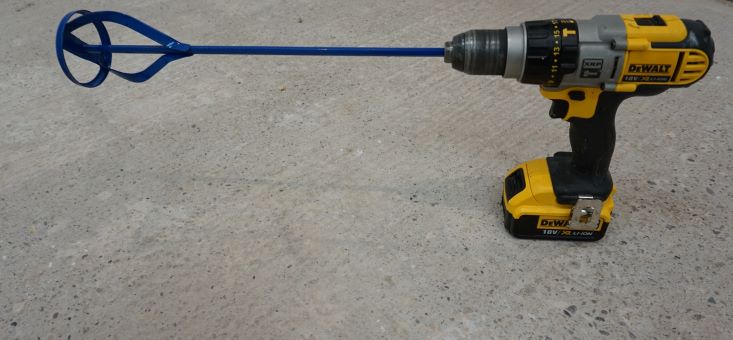
Make sure to thoroughly stir the paint before application, as the aggregate can settle on the surface. If the non-slip component isn't mixed well, you'll end up with a thick concentration of it initially, causing uneven distribution—resulting in less non-slip texture as you use more of the paint.
Use a mixer on a slow-running drill or a palette knife on smaller cans to mix the paint. An egg whisk, screwdriver, or small stick that doesn’t reach the bottom of the can is insufficient for proper mixing.
Mixing should take place for 3-5 minutes.
If you are adding thinners; they will need to be added once stirred.
Paint mixers are available to purchase. Click here to buy one.
Quantities are approximates per coat, we cannot allow for wastage and or any absorption that may occur with porous substrates.
Solvent Paint Calculator in Feet
Total Sqf:
Quantity Needed:
Quantities are approximates per coat, we cannot allow for wastage and or any absorption that may occur with porous substrates.
Additional Information
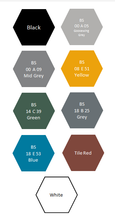
Prime Colors
Black, BS 00 A 05 Goosewing Grey, BS 00 A 09 Mid Grey, BS 08 E 51 Yellow, BS 14 C 39 British Racing Green, BS 18 B 25 Grey, BS 18 E 53 Blue, BS 445 Tile Red, White