A hot surface that reaches above 106 degrees (C) (you will need high temperature paints)
Disclaimer
The colours shown on the images are for guidance only. The displayed colour will depend on your monitor and browsers. The finished colour therefore may not be as shown here.
All pictures are for illustration purpose only - 1 & 2.5 Litre cans are not screen-printed cans.
Description
Description
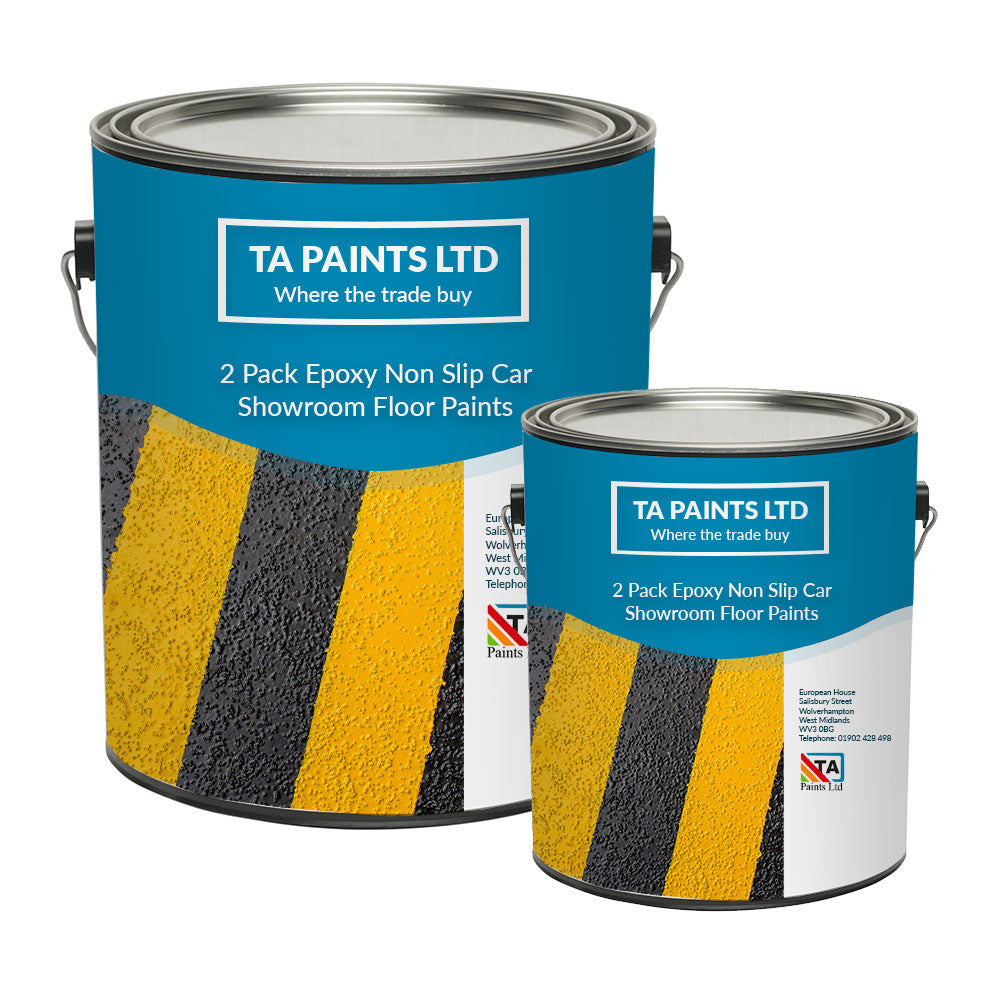
Upgrade Your Showroom Floors with Two Pack Epoxy Non-Slip Car Showroom Floor Paint
Enhance the safety and style of your showroom with our Two Pack Epoxy Floor Paint, featuring a pre-mixed aggregate for a durable, non-slip finish. Designed for high-traffic areas, this premium paint combines sleek, high-gloss aesthetics with enhanced grip, ensuring your floors are both beautiful and safe.
Ideal for concrete and metal surfaces, this epoxy paint is formulated to withstand heavy foot traffic, vehicles, and daily wear. Its non-slip finish provides added safety while maintaining exceptional resistance to chemicals, moisture, and abrasion, making it perfect for busy showrooms, workshops, and garages.
Epoxy paint with an aggregate already mixed in which makes a rough, textured finish that is ready to use of the can (after you have thoroughly stirred the paint) which is perfect for use in areas prone to moisture or spillage.
The most cost effective way and ease of application is on your first coat apply standard smooth two pack epoxy paint and then after 12-24 hours apply the second coat non slip.
Important Notice:
Do not apply two pack epoxy paint in temperatures below 10 degrees Celsius, as the cross-linking of the paint and catalyst will not occur, preventing the coating from fully drying.
While epoxy coatings are renowned for their superior chemical resistance and protection against the elements, it’s important to note that colours may chalk and fade when used in external applications.
It is also essential to remember that two pack epoxy paints cannot be applied over existing single pack paints, as they will react with them.
About This Item
About This Item
NEW 3-IN-1 TECHNOLOGY: When painting concrete it primes, seals and protects with just two coats. For bare concrete we recommend thinning the first coat by 20% with T0200 thinners, which acts as the primer/sealer.
EPOXY ANTI SLIP FLOOR PAINT: This two-part epoxy-based resin includes an aggregate mixed in, providing a rough textured finish that reduces the risk of slips.
SUITABLE SUBSTRATES: Concrete and Metal.
APPLICATION: Apply by brush or solvent-resistant medium pile rollers.
MIXING RATIO: The mixing ratio 4:1. 4 parts paint to 1 part hardener.
POT LIFE: Once the components are mixed, the pot life is around 4-6 hours.
COVERAGE: Approximately 8 square metres per litre. This does not account for the method of application, absorption of substrate or wastage.
DRYING TIMES: Touch dry 2-4 hours. Full curing takes 7 days, but the area can be walked on after 4 days.
Proudly manufactured in England by B.C Paints Ltd. Images and product titles are for advertising purposes only; tins are supplied in BC Paints cans or plain white for 1 and 2.5, and occasionally 5 litre cans.
Application
Application
Painting a Bare Concrete Floor:
Never pre-seal the floor prior to painting, particularly with latex or PVC sealers, as paint will not adhere properly.
Ensure good ventilation to allow vapour to escape; this is also essential for maintaining drying times. Without air movement, the coating cannot dry effectively.
New concrete floors should be left to dry for at least 3 months before painting. Any remaining moisture in the concrete can lead to paint delamination.
Step 1 - Clean and Abrade: Ensure the substrate is completely dry and free of any dirt, oil, or grease.
Power floated and smooth concrete floors must be mechanically abraded to ensure proper adhesion.
Be sure to stir the paint well before use.
Step 2 - First Coat / Prime: For the first coat, we recommend using the standard smooth Two-Pack Epoxy Paint, as it’s easier to apply than the non-slip version. Thin the paint by 20% with T0200 Epoxy Thinners, which helps it penetrate the concrete and act as a primer/sealer. If you prefer to use the Non-Slip Epoxy Paint for the first coat, the same 20% thinning applies.
Begin by cutting in around the edges with a 2- or 3-inch brush, and work backwards toward
Step 3 - Topcoat: Apply the second coat of paint within 12-24 hours of the first coat for optimal adhesion and performance. If you go over 24 hours then a light abrasion will be needed.
Two coats of topcoat are recommended for optimal coverage.
Painting a Bare Metal Floor:
Ensure good ventilation to allow vapour to escape; this is also essential for maintaining drying times. Without air movement, the coating cannot dry effectively.
Be sure to stir the paint well before use.
Step 1 - Clean: Ensure the substrate is completely dry and free of any dirt, oil, or grease.
Step 2 - Prime: As this product does not have anti corrosive properties you will need to use one coat of our Two Pack Epoxy Primer. Begin by cutting in around the edges with a 2 or 3 inch brush, and work backwards towards the exit.
Step 3 - Topcoat: Apply the first coat of top coat and overcoat with the second coat 12-24 hours after the first coat for optimal adhesion and performance. If you go over 24 hours then a light abrasion will be needed.
Two coats of topcoat are recommended for optimal coverage.
Application - Painting Over Existing Paint:
Ensure good ventilation to allow vapour to escape; this is also essential for maintaining drying times. Without air movement, the coating cannot dry effectively.
Be sure to stir the paint well before use.
Step 1 - Preparation: Check the suitability of the product for the existing paint. We recommend trying a sample area first, as two-pack epoxies cannot be applied over single-pack paints.
Step 2 - Clean and Abrade:
Ensure the existing paint is in good condition before painting.
Lightly abrade the surface to provide a key for good intercoat adhesion.
Remove any flaking paint prior to painting.
Ensure the substrate is dry and clean of dirt, oil or grease.
Step 3 - Prime (metal only):
For any rusted areas, sand back to bare metal and spot prime with the appropriate two pack epoxy primer.
Step 4 - Topcoat: Apply the first coat of top coat and overcoat with the second coat 12-24 hours after the first for optimal adhesion and performance. Begin by cutting in around the edges with a 2- or 3-inch brush, and work backwards towards the exit.
Two coats of topcoat are recommended for optimal coverage.
Primers
Primers
When painting bare metal a primer will be needed as this top paint doesn't have any anti-corrosive properties. Please see a list of compatible primers.
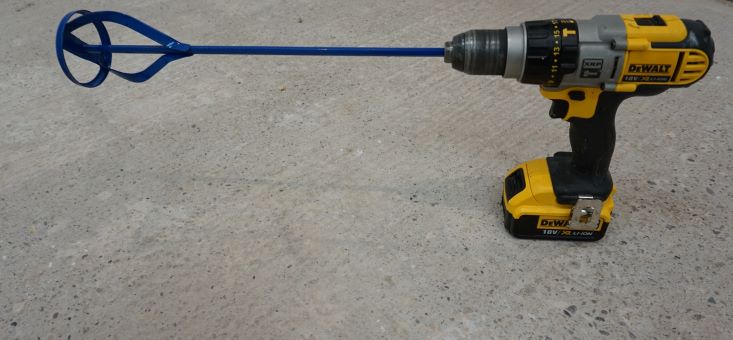
Use a mixer on a slow-running drill or a palette knife on smaller cans to mix the paint and catalyst together. An egg whisk, screwdriver, or small stick that doesn’t reach the bottom of the can is insufficient for proper mixing.
Mix the catalyst into the paint for 3-5 minutes, allow to stand for a minute, and then repeat.
Combine the catalyst into the tub before pouring it into a paint tray.
If you are thinning the paint for the first coat, this is added once the paint has been catalysed.
Ensure all components are thoroughly mixed to avoid any colour inconsistencies or drying issues.
Make sure to thoroughly stir the paint before application, as the aggregate can settle on the surface. If the non-slip component isn't mixed well, you'll end up with a thick concentration of it initially, causing uneven distribution—resulting in less non-slip texture as you use more of the paint.
%}
Additional Information
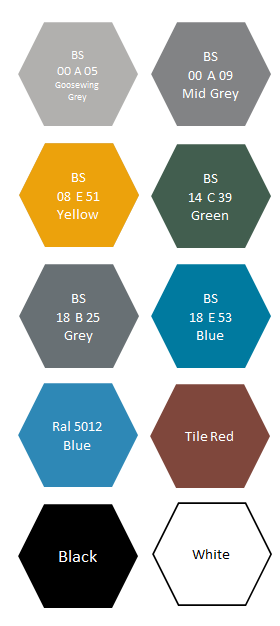
Prime Colors
Black, BS 00 A 05 Goosewing Grey, BS 00 A 09 Mid Grey, BS 08 E 51 Yellow, BS 14 C 39 British Racing Green, BS 18 B 25 Grey, BS 18 E 53 Blue, BS 445 Tile Red, RAL 5012 Blue Blue, White


 %}
%}